8/27/2009

French breakfast Puffs


I was looking for a new recipe to make for the kids for breakfast this week. It is their first week of school and I am trying to send them off with a homemade breakfast (at least for this week!) I needed to find something I could make fast and something everyone would like. Wow! This recipe is just what I was looking for! My kids devoured them and then fought over them after school. They have already requested them again. I love it when I find a winner!


French Breakfast Puffs

1 1/2 cups all-purpose flour
1 1/2 tsp. baking powder
1/2 tsp. salt
1/4 tsp. nutmeg
1/2 cup sugar
1/3 cup shortening
1 egg
1/2 cup milk

topping
1/2 cup white sugar
1 tsp. ground cinnamon
6 tbls. melted butter

Preheat the oven to 350 degrees and grease your muffin pans. I made 24 mini-muffins, but you could make regular muffins instead.

In a large bowl, mix together the flour, baking powder, salt and nutmeg. In a separate bowl, cream together the sugar and shortening. Add the egg and mix well. Stir the flour mixture into the shortening mixture alternately with the milk.

Spoon the mixture into your muffin pan. I used a large spoon to drop the batter into my new $4 pan from Wal-mart! I LOVE mini muffins! Bake the muffins for approximately 15 minutes, or until they are golden on top and a toothpick comes out clean. Just watch your oven.

While the muffins are baking, melt the butter in a bowl. In a separate bowl combine the sugar and cinnamon for the topping. When the muffins are done baking, remove them from the pan and immediately dip them into the butter...

and then into the cinnamon-sugar mixture. They were so hot & smelled so good!

Serve them warm with a side of scrambled eggs. Delicious. I think I am making them again in the morning.

8/18/2009

Blueberry Crumb Bars

I saw these bars on a blog last week and immediately knew I needed to try them. I have become addicted to blueberries lately, I put them on everything. I am a big cobbler fan also (what am I not a fan of?) so to combine blueberries and cobbler is YUM!

I have found a new favorite recipe. We ate it warm out of the oven with some vanilla ice cream and it was sooo good. I thought it couldn't get much better until I took a piece out of the fridge the next morning - yes, I ate a piece for breakfast! And it was even better cold! I am not allowed to make any more now. I have no will power.

I got this recipe from the blog yourhomebasedmom. She has lots of great recipes!

1 cup white sugar
1 tsp. baking powder
3 cups all-purpose flour
1 cup cold butter (2 sticks)
1 egg
1/4 tsp. salt
zest and juice of one lemon
4 cups fresh or frozen blueberries
1/2 cup white sugar
4 tsp. cornstarch

Preheat your oven to 375 degrees and grease a 9x13 pan.

Stir together the first three ingredients. Mix in the salt and lemon zest. Use a fork or pastry cutter to blend in the butter and egg. Pat half of the dough in the pan. It is okay if it is a little crumbly, just press it with your fingers until it looks like this.


In another bowl, stir together the sugar, cornstarch and lemon juice. Mix in the blueberries. I had some fresh berries but not enough, so I just substituted the remaining amount with frozen blueberries. I didn't even thaw them out! Layer the blueberry mixture over the dough in the pan.

Crumble the remaining dough over the top. It will already look pretty!


Bake in the preheated oven for 45 minutes or until the top is golden.

Eat warm with ice cream or wait until it is cool and cut into bars. Just try not to eat them for every meal!

8/17/2009

Watermelon and Strawberry Lemonade

I love lemonade in the summer! I found this recipe a while ago and make it every time I have a watermelon. It is really refreshing and my kids love it!
8 cups cubed and seeded watermelon
1 cup strawberries, halved
1/2 cup fresh lemon juice
1 cup white sugar
2 cups water
(you may substitute Sprite or 7-up instead of water)

Combine all the ingredients and blend until it is smooth (you may have to do it in 2 batches!) A fun trick I have learned, is to cube the watermelon and freeze it ahead of time. Then you have a tiny bit of a slushy feel - my favorite!!
Enjoy!

8/13/2009

My favorite Oatmeal Cookies

I am a HUGE fan of oatmeal cookies. I got it from my dad. We naturally gravitate towards them every time if given a choice. I have been making these cookies since I was a teenager. I remember making multiple trips down to the kitchen (in a day) for handfuls of them at a time. They are really that good.

3/4 cup shortening
1 cup packed brown sugar
1/2 cup sugar
1 egg
1/4 cup water
1 tsp. vanilla
3 cups quick oats
1 cup flour
1 tsp. salt
1/2 tsp. baking soda
raisins (optional)

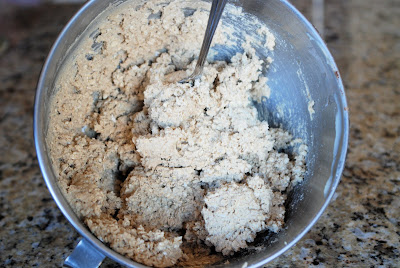
Add all the ingredients until the vanilla and mix well. Your cookie dough should be smooth and look like this (without the funny child trying to sneak in the picture!)


Next, add the dry ingredients and mix well. Your dough should be a little thick now.

Use a big spoon to drop the dough onto a greased cookie sheet. It doesn't need to look perfect, that is the great thing about oatmeal cookies! They actually look better when you can see all the texture.
Bake them for about 11 minutes at 350 degrees. Always watch the first batch really carefully to see how long they should bake in your oven. The trick to making these cookies GREAT is to undercook them just a bit. I like to take them out when they are just barely turning golden. It will seem like they wont be able to stay together, but if you let them cool they harden. This is also the trick to keeping them a little thicker. I like oatmeal cookies when they have a thick, chewy center instead of being thin and crispy. SOO Yummy!!

8/03/2009

Panukakku


Yeah, it's a funny name. This recipe is also known as mock waffles & german pancakes. But we call it this because my brother-in-law taught us the Finnish name. We thought it was funny and it has stuck.

My kids LOVE this dish. Honestly, there was a time a while back when I refused to make it anymore because I was so tired of it. They would ask for it everyday - and for every meal. I probably shouldn't complain, it is really easy to make. It takes about 5 minutes to whip it together and 20 to cook. Not bad!

Here is how you make it -

Preheat your oven to 400 degrees. While you are pre-heating, melt 1/4 cup (I use a little less) of butter in a 9x13 pan.
Beat together -
6 eggs
1 cup milk
1 cup flour
3 Tbls. sugar
1/4 tsp. salt

It is okay if it is the batter is lumpy, mine always is! When the butter has melted in the pan, remove it from the oven.

Pour the batter into the pan with the melted butter and bake for 20 minutes.

The best part of this dish is watching the batter rise as it cooks. You should end up with some really high sides - my kids fight over them! We love to eat it with some strawberry freezer jam and powdered sugar, Yum!

7/06/2009

Chocolate zucchini cake

This cake reminds me of summer.  My parents always have a great garden in the summer and give me lots of zucchini.  I love to make zucchini bread and when my mom gave me this recipe about 7 years ago, I knew it would be good too.   I have been making it ever since.  I like to shred a couple of zucchini, bag up the correct amounts and put it in the fridge or freezer to make this quickly.


Chocolate Zucchini Cake
1/2 cup soft butter
1/2 cup oil
1  3/4 cup sugar
2 eggs
1/2 tsp. vanilla
1/2 cup milk, mixed with 1 Tbsp. vinegar (or buttermilk)
4 Tbsp. cocoa
2 1/2 cups flour
1 tsp. baking soda
1 tsp. baking powder
1/2 tsp. cinnamon
2 cups shredded raw zucchini (with the peel)
1/2 cups chocolate chips ( or maybe more!)

The first thing you need to do is mix the 1 Tbsp. vinegar in the milk in a small bowl.  Let it sit for a couple minutes on the side.  You will notice it starts to make the milk curdle a little, that is exactly what you want.  This is a substitute for buttermilk!  If you happen to have buttermilk, you can skip this whole step - but it is nice to know a substitute, I have needed it often!

Next, cream the butter, oil, sugar, eggs and vanilla in your mixer.  Add the rest of the ingredients up to the zucchini and mix quickly.  When the dry ingredients have mixed in, add the zucchini and mix well.

Pour into a greased 9x13 pan and sprinkle with chocolate chips!  However many you like!  Bake at 325 degrees for 45-50 minutes.

Enjoy!  It tastes great warm with a little bit of ice cream.  But, I also love to eat it cold for breakfast - you cant go wrong!


6/30/2009

Kahlua Pork

I have been getting some requests for my new favorite recipe. I guess I have been talking about it a lot lately. But it is so good, I crave it all the time! The best thing is how easy it is to make. It takes some time and preparations, but it is pretty easy. I make it with a really yummy rice recipe I got from Our Best Bites blog - the only difference is I add a little coconut in the rice too. I cut up a fresh pineapple and make some Coconut rolls (in my next post!) and done! Delicious!
6 pound pork roast
Sea salt
1 Tbsp. liquid smoke
1 bag of shredded cabbage

The first thing I do is cut off as much of the fat off the roast as possible. It is so much easier to cut fat off the roast when it is frozen or cold than when it is warm. When you have gotten as much of the fat off the roast, pierce it all over with a large fork or knife. Rub the Sea salt into the meat with your hands. Then, do the same thing with the liquid smoke. Rub it in as good as you can & if you think it needs a little more, then add some more! Place the roast into the crock pot. You will want to do this the night before you are planning to eat - this meat needs to cook on low for about 20 hours!

After 20 hours, remove the meat and shred it with a couple forks and then return to the crock pot. In the meantime, strain the liquid to get rid of the "floaties" and then pour it back over the shredded meat.

About an half hour before serving, add the bag of cabbage and mix with the meat. I love the cabbage, it adds just the right texture to the pork.

I hope this pork makes you think of your last luau!

Coconut Custard Buns

I got this recipe from my friend Luseane, she is one of the nicest ladies I have ever met!  She is so nice, smart & she is an excellent cook.  This is probably my favorite thing she makes.  I am pretty sure she does it with homemade rolls, but I don't have the time (a little lazy) so I use frozen.  They are SOOOO yummy, honestly.  I choose to eat more rolls instead of dessert. That's how good they are.

1 bag frozen rolls (Bridgeford or Rhodes work well)
1 can coconut milk
1/2 cup sugar
1 Tbsp. flour
Shredded coconut

Spray a cookie sheet with Pam as many rolls as will fit (I fit 16 on mine).  Let the rolls raise at room temperature until about double in size.   After they have doubled, preheat the oven to 350 degrees.  Mix the can of coconut milk, sugar, flour and then pour the mixture over the rolls.  Sprinkle shredded coconut over the rolls and bake for 30 minutes.

You are going to LOVE them!


6/23/2009

Pull Aparts

This one is good, really good.  This is what I have eaten every Christmas morning since I was a little girl.  And now our family has made it a tradition for Easter and birthdays also, we can't wait to eat it!  Pete asked for this for Father's day and so we just had some again...yummy.

There are other names for this recipe, some people call it Monkey bread or sticky buns.  We call it Pull Aparts because you pull the gooey rolls apart.  But really, we should call it "Rip Aparts" because they get ripped apart so fast they are gone before you know it!  In fact, I didn't get my camera out quick enough and this is all that was left after everyone loaded their plates.

Pull Aparts

1 bag frozen rolls (about 24 rolls)
1 small vanilla non-instant pudding
1/2 cup brown sugar
1/2 cup chopped walnuts (optional, but really great!)
1 stick melted butter


Separate the frozen rolls and line them up into a greased bundt pan.  Melt the butter and pour over the rolls.  Then combine the pudding, brown sugar and nuts in a bowl.  After they are mixed, sprinkle evenly over the rolls - like the picture above.

Leave them uncovered on the counter all night long so the dough can rise.  When the rolls have risen well, bake it at 350 degrees for 30 minutes.  Invert it onto a platter and enjoy!!  
Be careful when inverting onto the platter - all the good gooey drippings come out then, so you don't want to waste any of it!  Seriously, my family watches to make sure none drips onto the counter!

6/17/2009

Surprise Peanut Butter Balls

I was on the hunt the other day for something that let me use my powdered milk I had in my food storage.  I had a box that was going to expire soon, and I am tired of it going bad without being used.  But really, I don't drink milk.  And powdered milk just isn't my thing.  Then I remembered seeing a recipe once for a little snack ball (yes, I love to study recipes).  I couldn't find it anymore, so I made it up.  And I have got to say, they turned out great!  I am having a hard time resisting them.
The best thing about this recipe is, you use what is in your pantry.  But, if you planned ahead you could make it pretty healthy without anyone knowing (hence, the "surprise" in the title).  This is what I used...

1 cup Honey
3 cups Peanut Butter
3/4 cup Grape Nuts cereal
1/2 cup Applesauce
1 cup Coconut
1 cup Chocolate Chips
1 cup crushed Corn Flake Cereal
6 Tbls. Powdered Milk
bowl full of crushed Graham Crackers (about 10 full crackers)


Throw all the ingredients except for the powdered milk into the mixer and blend well.  

Then add the powdered milk and mix until it looks like the picture above.  Using a regular spoon, shape dough into little balls.

Roll the balls in the crushed graham cracker crumbs.  You can see that I left mine a little chunky, I wanted to be able to taste the cracker too!

Next time I am planning ahead and going to make them with Bran cereal and some other good for you goodies hidden inside.  When you are done, you can pop them into the freezer or keep them in the fridge.  I put mine in the freezer and they defrost & are ready to eat in about a minute!  Sooo good!  Cold and peanut butter - perfect combination.